Showing posts with label glass. Show all posts

Saturday, 3 May 2014

Vitrum Balticum VI: Optical Outlook

Good News - I am officially an international glass artist!  My Revolution pieces have been selected to appear in an exhibition in Lithuania - Vitrum Balticum.  This is the sixth edition of the exhibition, and has the theme "Optical Outlook" - which I thought was perfect for these pieces:

Revolution, Georgia Redpath, 2014 (photo: Simon Bruntnell)
Luckily the jury agreed, and the pieces are now winging their way to Kaunas in Lithuania.  Keep your fingers crossed they arrive safely - I spent a full day with the packaging!!

If you happen to be in Lithuania over the next couple of months, please feel free to drop by and check on them for me! The exhibition takes place at the MK Ciurlionis National Museum of Art (their website has location and opening times). There are over 60 artists from 18 countries taking part - so there should be plenty of gorgeous glass to enjoy.

Thursday, 14 November 2013

Ten Steps for Slip Casting with Wax

I've had some 'work in progress' shots taken this week - including some wax models I've been building (there's a picture at the end of the post). Well, it's finally prompted me to share a technique I learnt back in September.

I was lucky enough to get a spot on the Kiln Casting Masterclass with Angela Jarman at the Glass Hub. Angela is a brilliant, down-to-earth teacher - and was happy to share her experience and techniques.  If you get chance to take a class with her, don't miss out! 

But it was one technique in particular that caught my imagination: slip casting wax in plaster. It's relatively simple - but allows you to make multiple repeats in a relatively short space of time.  (Which, for someone who normally works with cardboard, was a revelation...I have to admit, I almost cried with joy!)  The pieces are also hollow: a BIG advantage when it comes to making a lost wax casting, as there is much less wax to steam away.

STEP ONE: Switch on your wax pot! We've got a specially designed (if somewhat ancient) wax pot in the studio.  You can use also use a double boiler over a hob.  Two suggestions for safety: never melt wax over direct heat, and never leave your wax pot unattended. 
STEP TWO: You need a plaster mould.  It MUST be what I'd call a "drop out" mould - one where you can turn the mould over and your material will...drop out. Something without undercuts, and that doesn't get narrower towards the top. 

STEP THREE: The mould needs to be saturated with water.  Drop it in a bucket of water, and leave it until bubbles stop appearing. (If you wander away and forget, don't worry - but don't leave it for hours and hours, as the plaster will eventually start to deteriorate). The mould at the bottom of this picture has just been dropped in the bucket - and you can see some big bubbles. 

STEP FOUR: Remove the mould from the bucket and blot any surface pools of water away with some kitchen towel - or they'll spoil the surface of the wax.

STEP FIVE:  Fill the mould with wax.  A handy tip from Angela was to overfill slightly - the wax then grabs the edges of the mould, and can't shrink away and distort so easily. Though you probably don't need to be quite as messy as I was in this picture..!
STEP SIX: Wait until the wax starts to form a skin where it touches the mould - you'll see the wax change colour (and become matt rather than shiny).  This skin will get gradually thicker. Once it's thick enough to have picked up any detail in the mould - and to hold its shape, you can tip the liquid wax that's still sitting in the middle back into your wax pot. In the case of my moulds (the triangles have an edge of 100mm / 4") this takes about 3 minutes.  In the picture you can see the skin forming best at the corners of the triangle. 
STEP SEVEN: Give this internal surface a quick mist with a plant sprayer - so the remaining hot wax is chilled down.  You'll see the wax change from shiny to matt as you do this.
STEP EIGHT: Dump the mould (with the wax still inside) back into your bucket.  OK, maybe "dump" is a bit strong, perhaps "drop carefully" would be better!

STEP NINE: Once the wax is chilled, it will shrink away from the mould and should release. You may have to help if you've got drips of wax clinging to the sides of the mould (like with my messy pour...) But if it was a neat and tidy pour, the wax normally floats away from the mould all by itself.  
STEP TEN: HURRAH! You have your first wax.  Now repeat, repeat, repeat - and build something new and exciting from your components. This is what I've been making with mine: 

Work in Progress (Georgia Redpath)
(photo: Simon Bruntnell)

Friday, 10 May 2013

Stourbridge Open Studios

It's time to do a little last-minute marketing for the Stourbridge Open Studios event, which will be happening next weekend:


Jo Newman, one of the artists based at the Ruskin Glass Centre had a brilliant idea last year - to create an Open Studios network in and around the Stourbridge area.  Thanks to her determined steering, we will be opening our doors for the first official event on the weekend of 18 & 19 May.

May's Open Studios is the "test-bed" event, based entirely at the Ruskin Glass Centre - so that lessons about marketing and organisation can be learnt on a relatively small (and friendly) scale.  But the aim is to spread the network in the future, to include artists, studios and makers from the wider area.

There are 18 studios at the Ruskin Glass Centre (they aren't all focused on glass: have a look at the centre's "studios" page). So there's already plenty to see next weekend.  But as well as on-site artists/makers there are two additional highlights involving people from around the country:


Simon Bruntnell (a photographer with a studio at the Glass Centre) is a partner in an online glass gallery, Bruntnell-Astley.  Simon will be hosting a Pop-Up Gallery event for the weekend, showing Bruntnell-Astley artists.  The image on the right is his poster for the pop-up event - so you can get an idea of the stellar line-up! (The work that you can see in the poster is by Laura Birdsall)

And last, but not least, there will be the Black Country Echoes exhibition (you can see the poster for this on the left).  This is an exhibition of glass, metal and ceramics work from applied arts students at Wolverhampton University - including Tim Boswell (a previous winner of the Glass Sellers' Student Award at the British Glass Biennale)

If you can make it down to the Ruskin Glass Centre next weekend, please come along!  And feel free to share the information with anyone you think might be interested...

Wednesday, 1 May 2013

...and again!

And so we reach the final instalment of my saga about Shape Shifters (the Dancers) - work which started a full five years ago!

In my last two posts I've explained the back story and design work and also the glass making.  Now for a little information on the laser cutting and final construction.

You might remember that I'd prepared some drawings in Inkscape, ready to be cut using a laser cutter.  Well, the morning of my booking came around, and I headed off to Black Country Atelier in Birmingham's Jewellery Quarter with my USB pen and a box full of plywood (purchased from Hobarts).

The drawings made in Inkscape (which you can see on the right) need to be imported into the software which actually controls the laser cutter - and then it's a matter of choosing both the right power and speed settings to enable the laser to cut through your chosen material.  Luckily, Black Country Atelier have a number of sample sheets with cuts made at a variety of settings - which reduces the amount of guesswork for a beginner like me!


The photo above shows the laser at work cutting one of my Inkscape files.  You can probably see that the plywood has been stuck to the bed of the machine with masking tape - that's to hold the wood flat (there was a little bit of curvature on some sheets).

With a little help, I managed to cut 5 pattern sheets in just over 2 hours, each variations on the design above.

Then it was a matter of construction...

Each layer of plywood was 3mm or 6mm thick, and by sticking these layers together, I was able to build up the final "frames" to hold the glass.  Here you can see some of the frames clamped together while the glue dries.

On the front and back faces, I added an extra relief layer - which I decided to stain in a darker colour.  This tied in nicely with the burnt edges of the plywood.

And this photo to the left shows the final form of the pieces.

I've still got to glue the back faces onto the frames - but that'll happen once I get the glass back from its acid dip!

I had a lot of fun with this project - and it was great to finally complete a design idea that's being lurking at the back of my mind for so long!

Thursday, 25 April 2013

Dancing again

Earlier this week in Another Dance? I posted about some new work, which was really my opportunity to finally finish something started back in 2008.  In that post I'd got as far as making some cardboard models - to be used for mould making.

Well this photo shows those cardboard models set up ready for casting in silicon. 

I've previously used gelflex for shallow relief casting - but think I may have been converted to two-part silicon.  It holds its shape better, isn't so bubbly and gives a harder, stronger final mould.  The one major drawback is the price - because silicon can't be melted and reused like gelflex.

The walls for the mould are slices from a drainpipe, and these have been sealed at the base with clay.  The blue sheets underneath the mould are sticky back plastic - to prevent the cardboard lifting away from the board.

Here you can see the three silicon moulds, ready for casting themselves. (In a delightful shade of mint green!)

Again, I've used sticky back plastic to keep the silicon from floating away.  But instead of drainpipe, the walls for these moulds are slices of postal tube. I varnished the inside with a quick layer of shellac - so that the plaster wouldn't weld itself to the card.


Once sealed with clay at the base, the silicon moulds were then ready to be cast in SRS glass (a plaster-based investment) - which I buy from Special Plasters in Birmingham.  This has the necessary additions to reduce the likelihood of the mould cracking and failing at high temperatures.

This photo shows the final investment moulds once they've been released from the cardboard tube - and had the silicon removed, of course! I then went on to make a second set of investment moulds.

Once I'd finished the moulds, I left them to air dry for a couple of days.  Then came the firing:


Here you can see the six moulds set up in the kiln ready for firing.  I cut six pieces of fibre board (specially designed to survive kiln temperatures), and  cut a hole in each with a pastry cutter.  It works...but don't use it for pastry afterwards!


The pieces of board are then placed on top of each mould, to support small earthenware plant pots - which hold the lead crystal casting glass.  Once the glass reaches casting temperature, the glass melts and drains through the hole in the bottom of the plant pot (and the hole in the board) directly into the mould.  

Because I'm working with geometric shapes, it is possible for me to calculate the volume of glass I require relatively accurately using mathematical formulae.  In this case, the formula for the volume of a cylinder (πr2 x h).  I can then multiply the volume by the density of my glass, to work out the weight of glass required.  I usually use Gaffer Glass, which has a density of 3.6g/cc.  There are other ways to calculate how much glass you need which don't require as much (if any) Maths!  I clearly just need to torture myself..!  You then need to add a little extra "for the pot" - as not all the glass will manage to drain through.


This final shot shows the glass after firing and removing from the mould.  You can see at the edges that the glass isn't shiny where it has touched the mould.  It needs to be polished.  With lead crystal you have the possibility of using hydrofluoric acid to polish - though some smoothing with a diamond pad may be required first.  I don't work with the acid myself, but take my glass to a commercial crystal company who will dip small pieces.

Well that deals with the glass side of things - but I still haven't covered the laser cutting!  I'll have to do one more post later in the week... Bye for now!

Wednesday, 30 January 2013

Deep Blue: Testing, Testing

Part 3 of a series of posts explaining the inspiration/process behind my piece Deep Blue. Part 1 is called Deep Blue: Inspiration, and Part 2 Deep Blue: Folding.


My last post finished with the creation of a cardboard prototype for a modular unit which would repeat and tessellate to build up different forms.

But I was a little worried about the unit: it was a truly three-dimensional form with undercuts.  Up until this project, I'd generally used only shallow casting techniques - and so moulds with open faces, rather than reservoirs and sprues...

I therefore decided to look at whether this pattern could be replicated in sheet form - at least that way I'd have a back-up plan! Although borne of being a bit of a scaredy-cat, this did actually result in really exciting line of enquiry!

Via a few leafy lanes (more about them in a later post!), I eventually created a flat relief form based on the same diamond repeat as the modular unit.  This involved some adjustments to a folding pattern found in Paul Jackson's Folding Techniques for Designers, to counteract the natural curve.

The photo is a close-up of the relief - which is folded from a single A1 sheet.  I have to say that, despite the colour, it reminds me of lots of baby birds demanding food...

As this sheet form is an example of an origami tessellation, I knew that, like my three-dimensional form, it could be broken down into a single modular unit.  So from a simple repeated unit, I could build up a larger piece.
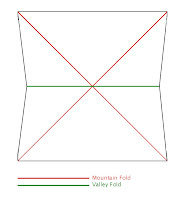
 The line diagram is the fold pattern for the single unit - which, with the addition of a reservoir, I used to create the nine cardboard moulds in the next picture.

These are negative moulds, and were used to make positive moulds of the unit in gelflex rubber.  You now get to see a beautiful picture of me (ahem) - as it's the only picture I've got which shows the gelflex!


You can see some of the individual gelflex moulds in the bottom right corner of the picture - and I'm busy pulling the rest out of the investment mould which they made. 


This mould was then charged with some lovely aqua blue casting crystal from Gaffer Glass, and fired up to casting temperature, to create individual glass units.  The picture here shows six of the units after they've been tack fused in a slumping mould (hence the curved shape).  If you're wondering why the surface is wrinkled like skin, this happened during the slump - and I assume is due to surface tension at that temperature.

So the modular unit seemed to work - and to repeat and tessellate fairly well. BUT, the tests had thrown up a rather important issue...COLD WORK.  To tessellate well, there would need to be minor corrections - and the surfaces would also need to be smoothed and polished (especially if I needed to correct for "elephant skin"!)  This turned out to be quite difficult and time consuming on the internal angle.  If I didn't want to spend my life coldworking, I was going to need to modify my thinking again!


Saturday, 26 January 2013

Deep Blue: Folding

In my last blog post, I introduced you to the lovely Georgian decanters from Broadfield House Glass Museum. Now I'll try and explain how they inspired my final piece...


My normal glass casting method is based on the collagraph printing technique: I build up a relief collage in textured paper and card, from which I make my moulds.

And this is how I started the project - working in my sketchbook with patterns based around the diamond cuts on the decanters, and experimenting with different textures and relief levels.


But it just didn't seem right to be working in a two dimensional format: it wasn't doing the decanters justice.  The sketchbook work did, however, remind me of a folded box form from the book Paper: making, decorating, designing by Beata Thackeray


Using this as my starting point, I started researching / experimenting with folded paper forms - again using the diamond cuts as the inspiration.

Anyone interested in this type of folded form should definitely take a look at the work of Paul Jackson. As well as doing brilliant paper sculpture of his own, he has written books covering all forms of paper engineering. They all include great "basics", ideas to play with and real inspiration:
 - Structural  Packaging
 - Folding Techniques for Designers
 - The Pop-Up Book


However, once you start making taller three-dimensional forms in glass, you need much longer kiln times - in particular because they need to be annealed for such a long time to avoid temperature differences within the piece. For that reason I was keen to simplify - and perhaps create a "unit" which could be repeated to make a larger form.  I took the yellow folded form above as my starting point (because it reminded me of Sam the Eagle from the Muppets..!)


By cutting down the height of the yellow model to just two layers (between the horizontal lines) and adding a top and a base, I found a unit which would tessellate - and also sit - in a number of different ways.  I now had to think about how I could go about casting multiples in glass.  More about that next week..! 

Wednesday, 23 January 2013

Deep Blue: Inspiration

Lots to catch up with on the blog front..! 

I'm going to start with some posts about Deep Blue - a piece which I made for an exhibition at Broadfield House Glass Museum: Back to the Future (catch it until 27 January 2013)

The Museum invited West Midlands glass artists to propose new pieces of work - taking inspiration from their collections and archives. Broadfield House has a great collection (I've already done a post on their wonderful glass owls) - so it's definitely worth a visit.  Plus, there's the added bonus of seeing glass blowing in action - glass artist Allister Malcolm has his hot glass studio on site.

from Broadfield House Glass Museum (Image: Simon Bruntnell)
Although I have an obvious soft-spot for the owls, it was this pair of Georgian decanters from the 1780s which actually sparked my imagination. 

It was the colour which hit me first - they couldn't help but stand out from the crowd.  Let's face it, most modern cut crystal is clear/colourless - but in the 1780s these must've been really unusual!

And it wasn't just the colour, but the form too. I like to image that Norman Foster had popped into the Museum just before he designed 30 St Mary Axe (aka the Gherkin). Modern architecture has nothing on these beauties!

Tune in later this week, to find out how the decanters made me abandon my glass (albeit temporarily) in favour of some large sheets of paper, a pencil and a ruler.

Friday, 8 June 2012

Harding House Exhibition

I've been perfecting my wax casting skills over the past few weeks, as part of the process of making my piece for the Back to the Future exhibition at Broadfield House Glass Museum. There's lots to share, so I will definitely have to put together a couple of posts in the next couple of weeks. 

For the moment, some news on other pieces.  While waiting for wax to melt, set etc I've been having fun cutting glass for some fused glass platters (which actually tie in with the cast pieces):

Groovy Pyramid platters
I'll be sending these (along with some cast pieces) to Harding House Gallery in Lincoln (UK) in a couple of weeks, for an exhibition called Glass from the Centre.  This will showcase the wide variety of studio glass produced by makers at the Ruskin Glass Centre in Stourbridge. 

As you can see from the picture, the gallery is set in a wonderful half-timbered building in the heart of Lincoln.  The street - Steep Hill - has been voted the best street in the UK for its mix of independent shops and historic buildings.  It links the city's historic centre to the High Street.

The exhibition will run from Saturday 9 June to Saturday 14 July.  In addition to the exhibition, Harding House always has work from local makers on show in their ground floor display.

Glass from the Centre

Hurrah! It's all installed and looking good - and will officially be open from tomorrow (Saturday 9 June).  Glass from the Centre showcases the work of studio glass artists from the Ruskin Glass Centre in Stourbridge - and runs at Harding House Gallery until Saturday 14 July.

Glass from the Centre: exhibition view I
Glass from the Centre: exhibition view II

Blown glass, fused glass, cast glass, stained glass - and even some ceramics.  There is something for everyone - from jewellery through to sculptural pieces.

A big 'thank you' to Lynn Baker and Soo Durham - who look after the exhibition space at Harding House Gallery.  Set-up would have been much more difficult without their expertise (and patience!) with everything on Tuesday.  It meant I could spend Wednesday making sure everyone's work was shown to best effect!  Along with putting on those all-important name and price labels...

If anyone else has set up an exhibition recently, I'd be grateful for feedback - and for any tips and tricks to help in the future!


Thursday, 1 March 2012

Birmingham joins Pugin Celebrations

A chance reading of a retweet last night from Birmingham Museums and Art Gallery has alerted me to the fact that we are celebrating Pugin’s bicentenary this year.  Two hundred years since the gothic revivalist and ever-so-slightly-decorative master was born.  

Definitely the kick up the behind I need to go and explore the interior of St Chad’s Cathedral – as it’s rumoured to rival the Houses of Parliament.  And the kind folks at Birmingham Museums / the Pugin Society have put together a trail of other Pugin highlights found in the city.  (Apparently available at city tourist offices now, though I won't be in Birmingham to grab mine until Saturday.)

Hardman Design - for auction(!) at Biddle & Webb, 2 March
As part of a host of bicentennial celebrations in Birmingham (see information here), there will be an exhibition at the Museum of the Jewellery Quarter – opening on 22 March.  This will feature the work of John Hardman Jr, who produced a lot of the metalwork and stained glass for Pugin right in the heart of Birmingham. 

I think, between the trail and the exhibition, it looks like I may just get my glass fix!

Thursday, 23 February 2012

British Glass Foundation

Having posted about those fantastic Owls at Broadfield House Glass Museum, I suddently thought it might be worth a quick post to let people know about the work of the British Glass Foundation. 

The organisation was set up in response to the threatened closure of Broadfield House - and so aims to make more people aware of the outstanding glass collections and archives held by Dudley Council.  But the Foundation is also interested and involved in the wider glass world - both heritage and contemporary.  So, if you have an interest in glass, click this link to access their website: British Glass Foundation.

Tuesday, 21 February 2012

Back to the Future

I've had some great news this month: my proposal has been selected for an exhibition at Broadfield House Glass Museum - "Back to the Future".  The pressure's on, as the exhibition will take place during the International Festival of Glass this summer - so there should be lots of glass-obsessed visitors!

Back to the Future will celebrate 400 years - yes, that's four hundred - of glassmaking in Stourbridge (in the West Midlands).  Contemporary glass artists were asked to propose work inspired by the historic glass collections held by Dudley Council - which runs Broadfield House.


If you're close enough to visit the Museum, I'd recommend it - there really is something for everyone.  One of my favourite finds during this project was the cabinet of glass owls - the "Wilkie Cooper Collection".  The pictures show just a tiny taster!  I was definitely tempted to use them as the inspiration for my proposal - but went in an entirely different direction.  More on that another time.

Thursday, 15 December 2011

Secretive urban nature

This week, I've been busy making bindings so I can turn an edition of The Urbanites into books.  The deadline is next Tuesday - when Simon Bruntnell has been booked for a photo-shoot! (Simon took the image above, of an oak-framed edition of The Urbanites).

The glass came back from acid dipping yesterday - so it has been a mad scramble to get the individual pieces seated within their respective book blocks.  I've just screwed the first one together (the binding uses book screws / interscrews)...it's looking hopeful. 

Presenting the pieces as books was the original concept for the collection: you have to take the trouble to open the book to appreciate the beauty within.  Just like the nature within our towns and cities...

Expect some photos next week!