My last post finished with the creation of a cardboard prototype for a modular unit which would repeat and tessellate to build up different forms.
But I was a little worried about the unit: it was a truly three-dimensional form with undercuts. Up until this project, I'd generally used only shallow casting techniques - and so moulds with open faces, rather than reservoirs and sprues...
I therefore decided to look at whether this pattern could be replicated in sheet form - at least that way I'd have a back-up plan! Although borne of being a bit of a scaredy-cat, this did actually result in really exciting line of enquiry!
Via a few leafy lanes (more about them in a later post!), I eventually created a flat relief form based on the same diamond repeat as the modular unit. This involved some adjustments to a folding pattern found in Paul Jackson's Folding Techniques for Designers, to counteract the natural curve.
The photo is a close-up of the relief - which is folded from a single A1 sheet. I have to say that, despite the colour, it reminds me of lots of baby birds demanding food...
As this sheet form is an example of an origami tessellation, I knew that, like my three-dimensional form, it could be broken down into a single modular unit. So from a simple repeated unit, I could build up a larger piece.
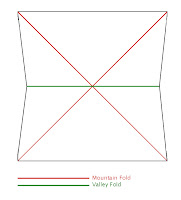
 The line diagram is the fold pattern for the single unit - which, with the addition of a reservoir, I used to create the nine cardboard moulds in the next picture.
These are negative moulds, and were used to make positive moulds of the unit in gelflex rubber. You now get to see a beautiful picture of me (ahem) - as it's the only picture I've got which shows the gelflex!
 You can see some of the individual gelflex moulds in the bottom right
corner of the picture - and I'm busy pulling the rest out of the
investment mould which they made.
This mould was then charged with some lovely aqua blue casting crystal from Gaffer Glass, and fired up to casting temperature, to create individual glass units. The picture here shows six of the units after they've been tack fused in a slumping mould (hence the curved shape). If you're wondering why the surface is wrinkled like skin, this happened during the slump - and I assume is due to surface tension at that temperature.
So the modular unit seemed to work - and to repeat and tessellate fairly well. BUT, the tests had thrown up a rather important issue...COLD WORK. To tessellate well, there would need to be minor corrections - and the surfaces would also need to be smoothed and polished (especially if I needed to correct for "elephant skin"!) This turned out to be quite difficult and time consuming on the internal angle. If I didn't want to spend my life coldworking, I was going to need to modify my thinking again!


No comments:
Post a Comment